创建一个非root用户,专用于git登录

如果系统自带一个非root用户,感觉也可以直接使用。当然最好创建一下,然后不让这个用户使用交互shell(完成所有的操作之前,不要禁用交互shell,因为下面的大部分创作,都需要在使用该用户权限来操作)。创建的办法,参考https://www.liaoxuefeng.com/wiki/896043488029600/899998870925664

新创建的用户,可能没有添加sudoers文件中,没有root权限,这样可以参考git出现xxx is not in the sudoers file This incident will be reported的解决方法

注意:如果不想使用密码登录或者git不想使用密码,用户创建完成之后,将本地ssh的公共密钥放置在~/.ssh/authorized_keys文件中。

安装nginx

安装的方法,参考:https://www.digitalocean.com/community/tutorials/how-to-install-nginx-on-ubuntu-16-04

sudo rm /var/www/html/index.nginx-debian.html
sudo chown git:www-data /var/www/html

注意:这里的用户git应该替换成实际的用户,因为nginx默认的用户很可能是root,这样无法被非root用户使用。

  • 添加ssl
server {
        #listen 80 default_server;
        #listen [::]:80 default_server;

        # SSL configuration
        #
        listen 443 ssl default_server;
        listen [::]:443 ssl default_server;

        ssl_certificate      domain_bundle.crt;
        ssl_certificate_key  domain.key;

        #
        # Note: You should disable gzip for SSL traffic.
        # See: https://bugs.debian.org/773332
        #
        # Read up on ssl_ciphers to ensure a secure configuration.
        # See: https://bugs.debian.org/765782
        #
        # Self signed certs generated by the ssl-cert package
        # Don't use them in a production server!
        #
        # include snippets/snakeoil.conf;

        root /var/www/html;

        # Add index.php to the list if you are using PHP
        index index.html index.htm index.nginx-debian.html;

        server_name _;

        location / {
                # First attempt to serve request as file, then
                # as directory, then fall back to displaying a 404.
                try_files $uri $uri/ =404;
        }
}

安装jekyll

安装方法参考:https://jekyllrb.com/docs/installation/ubuntu/

将以下代码添加到.bashrc文件中

export GEM_HOME="$HOME/gems"
export PATH="$HOME/gems/bin:$PATH"

创建git仓库

参考:https://www.digitalocean.com/community/tutorials/how-to-deploy-a-jekyll-site-using-git-hooks-on-ubuntu-16-04的Step 2 — Setting Up a Git Repository

  • 将本地代码推送到服务器
  • 将服务的repos,clone一份到临时文件夹

在临时文件夹,运行jekyll serve,看看发生生么错误,直到把所有的没有安装的都安装完全,不再发生错误。

在repo中的hooks/post-receive文件里边,写入以下的代码

#!/usr/bin/env bash

export GEM_HOME="$HOME/gems"
export PATH="$HOME/gems/bin:$PATH"

GIT_DIR=$HOME/osier.git
TMP_GIT_CLONE=/tmp/osier.blog
PUBLIC_WWW=/var/www/html

git clone $GIT_DIR $TMP_GIT_CLONE
jekyll build -s $TMP_GIT_CLONE -d $PUBLIC_WWW --incremental
rm -Rf $TMP_GIT_CLONE
exit

将本地的repo的remote地址根据实际更改,然后推送即可。

git remote set-url origin ubuntu@[ip or domain]:osier.git
# OR
git remote add origin <url>

删除的方法为

git remote remove <name>
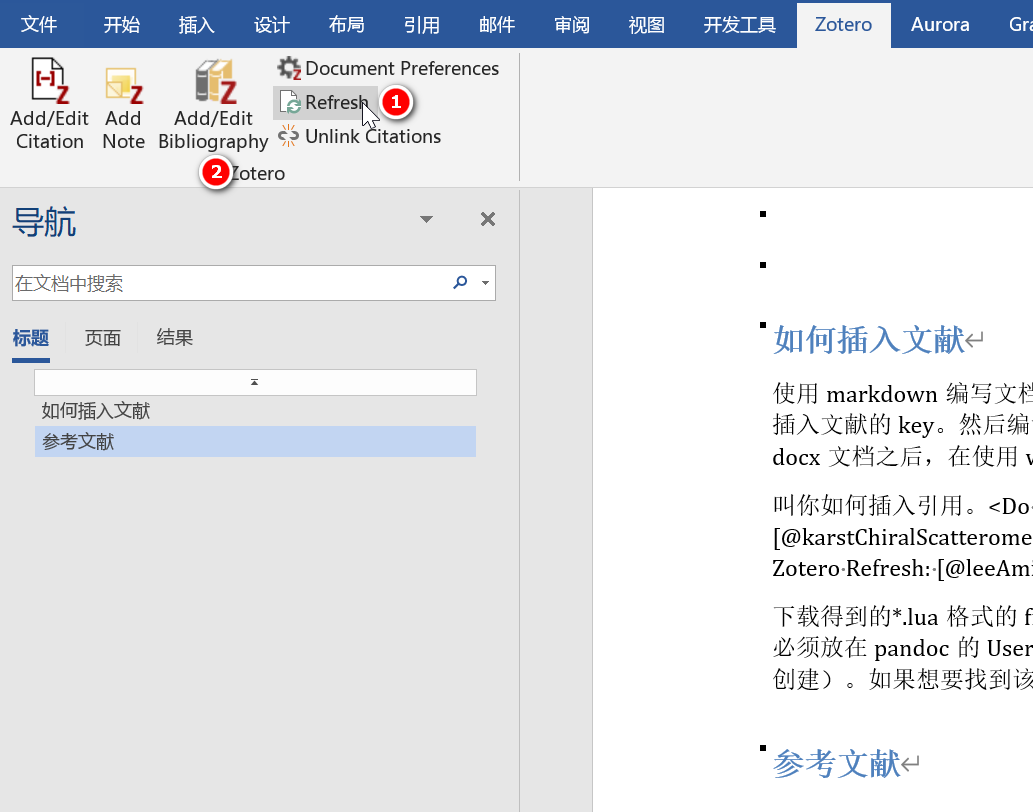
使用pandoc编写文档时涉及文献管理,前边的文章使用Pandoc编写docx和pdf文件的实践有讲到docx和pdf两种文档的情况。这两种情况都使用的是系统默认的--citeproc过滤器。不过,使用--citeproc这种方式需要首先准备好bib文献。如果只编写docx文档。那么还可以使用Better BibTeX的作者编写的zotero.lua过滤器。

安装

https://gist.github.com/retorquere/76d81cb264339a69ab88d39ecb75fabb网址中,下载zotero.lua文件。使用pandoc -v得到user-dir。然后创建子目录filters,然后将zotero.lua放在filters目录下。

使用

只要在markdown文件中插入[@ref_key](后边将讲解如何使用vscode快捷插入)。然后使用下边的代码转换:

pandoc -s --lua-filter=zotero.lua filename.md -o filename.docx 

当然markdown文件的yaml需要设置类似如下的代码(精简版),更加详细的代码参见https://retorque.re/zotero-better-bibtex/exporting/pandoc/

zotero:
  client: zotero

docx文件生成之后,默认文献还没有像正常的文档那样,使用下面图片的步骤进行转换。 格式化引用

可见整个过程不涉及bib文件。对于其中涉及图片、表格以及公式的引用,仍然使用之前文章讲到的pandoc-fignospandoc-tablenos以及pandoc-eqnos过滤器。

vscode中如何插入文献引用

Zotero LaTeX(https://marketplace.visualstudio.com/items?itemName=bnavetta.zoterolatex)就有该功能。不过该插件默认只能在latex语言环境中工作。因此需要一些额外的修改。如果不想额外的修改,其实只需要安装一个额外的插件mblode.zotero

package.json文件中,分别于menuskeybindings键中添加了markdown的支持,方便在pandoc中使用。

extension.js文件中,于cayw方法之后添加了caywPandoc,用于获取pandoc格式的引用支持,参考:https://retorque.re/zotero-better-bibtex/citing/cayw/

function caywPandoc(format) {
    return __awaiter(this, void 0, void 0, function* () {
        let options = { format };
		options['brackets'] = 'true';
		options['minimize'] = 'true';
        const res = yield source$1(`${serverUrl()}/cayw`, {
            query: options
        });
        return res.body;
    });
}

一个相似的curl代码为:

curl -s "http://127.0.0.1:23119/better-bibtex/cayw?format=pandoc&minimize=true&b rackets=true"

然后将addCitation进行修改,根据语言环境的不同,插入不同的结果。代码获取参考:https://code.visualstudio.com/api/extension-guides/command

var activeEditor = vscode.window.activeTextEditor;
var citation;
// create different format style for markdown and latex
if(activeEditor.document.languageId == 'latex'){
    citation = yield cayw('biblatex', latexCommand(), minimizeAfterPicking());
}else{
    citation = yield caywPandoc('pandoc');
}

这样在latex文件中,插入的样式是\cite{key},而在markdown文件中,插入的样式是[@key]。修改插件之后,方便在markdown中插入引用。

pandoc可以将.md文件转换成pdf和docx文档。不过,如果想要建立包含图片、表格、公式和文献引用,实现起来就需要一些额外的设置了。这里的默认编辑器为vscode。

Pandoc安装

如果已经安装了anaconda环境,那么使用下面的代码即可安装:

conda install pandoc

不过这种方法安装得到pandoc文件不一定是最新版的,如果想要安装最新版的。可以先使用如下代码获得pandoc文件的位置,然后去https://github.com/jgm/pandoc/releases下载最新版的文件,然后覆盖到pandoc文件原来的位置。

where pandoc

如果使用conda安装的,则一般来说说,默认的位置在python环境的下级目录Scripts中。比如我的pandoc默认在C:\ProgramData\Anaconda3\Scripts中(为了方便说明,将该路径成为Scripts路径)。

编写PDF文档

为了编写漂亮的PDF文档,我选择了使用eisvogel.tex,下载地址参见:https://github.com/Wandmalfarbe/pandoc-latex-template

  • 设置颜色标题页
titlepage: true
titlepage-color: "3C9F53"
titlepage-text-color: "FFFFFF"
titlepage-rule-color: "FFFFFF"
titlepage-rule-height: 2
  • 设置图片标题页
titlepage: true,
titlepage-text-color: "FFFFFF"
titlepage-rule-color: "360049"
titlepage-rule-height: 0
titlepage-background: "background.pdf"
  • 示例task
{
    "label": "Pandoc PDF Document Using EISVOGEL",
    "type": "shell",
    "command": "pandoc",
    "args": [
        "--listings",
        "--pdf-engine",
        "xelatex",
        "--defaults=${env:APPDATA}\\Code\\User\\additions\\pdf.yml",
        "--template",
        "${env:APPDATA}\\Code\\User\\additions\\eisvogel.tex",
        "${file}",
        "-o",
        "${fileDirname}\\${fileBasenameNoExtension}.pdf",
    ],
    "presentation": {
        "echo": true,
        "reveal": "silent",
        "focus": false,
        "panel": "shared",
        "showReuseMessage": true,
        "clear": false
    }
},
  • pdf.yaml文件
csl: "C:\\Users\\<username>\\AppData\\Roaming\\Code\\User\\additions\\american-chemical-society.csl"
filters:
- pandoc-crossref
- citeproc

这里pandoc-crossref的安装方法可以参见https://github.com/lierdakil/pandoc-crossref,说明参见https://lierdakil.github.io/pandoc-crossref/。安装文件,最直接的安装方法就是下载pandoc-crossref.exe然后放在Scripts路径。

  • 示例pandoc的yaml文件
---
title: 请输入标题
CJKmainfont: "STSong"
author: ["<username>"]
date: 2021年10月29日
listings: True
bibliography: [ref.bib]
---
  • 示例的引用设置
figPrefix: "图"
eqnPrefix: "公式"
tblPrefix: "表格"
titleDelim: period
figureTitle: "图"
tableTitle: "公式"

更加详细的设置,参考https://github.com/lierdakil/pandoc-crossref

编写docx文档

  • 示例yaml
---
title: 请输入标题
author: ["<username>"]
date: 2021年10月29日
bibliography: [ref.bib]
---
  • 示例task文件
{
    "label": "7. Pandoc Docx Document",
    "type": "shell",
    "command": "pandoc",
    "args": [
        "--reference-doc=${env:APPDATA}\\Code\\User\\additions\\referrence.docx",
        "--defaults=${env:APPDATA}\\Code\\User\\additions\\docx.yml",
        // "-N",
        "'${file}'",
        "-o",
        "${fileDirname}\\${fileBasenameNoExtension}.docx",
    ],
    "presentation": {
        "echo": true,
        "reveal": "silent",
        "focus": false,
        "panel": "shared",
        "showReuseMessage": true,
        "clear": false
    }
},
  • 示例docx.yaml
csl: "C:\\Users\\<username>\\AppData\\Roaming\\Code\\User\\additions\\american-chemical-society.csl"
# highlight-style: tango
filters:
- pandoc-fignos
- pandoc-tablenos
- pandoc-eqnos
- pandoc-secnos
- pandoc-docx-pagebreakpy
- citeproc

这里pandoc-fignospandoc-tablenospandoc-eqnospandoc-secnospandoc-docx-pagebreakpy。这些插件的安装方法可以pip方法安装。如果无法安装,则下载下来放在Scripts文件夹中。

  • 示例引用yaml
fignos-plus-name: 
fignos-caption-name: 
fignos-caption-separator: period
fignos-cleveref: true
tablenos-plus-name: 
tablenos-caption-name: 
tablenos-caption-separator: period
tablenos-cleveref: true

其他的设置参见https://github.com/tomduck/pandoc-fignos

如果打开powershell或者跨平台的pwsh之后,无法使用conda命令,如何初始化环境呢。

anaconda

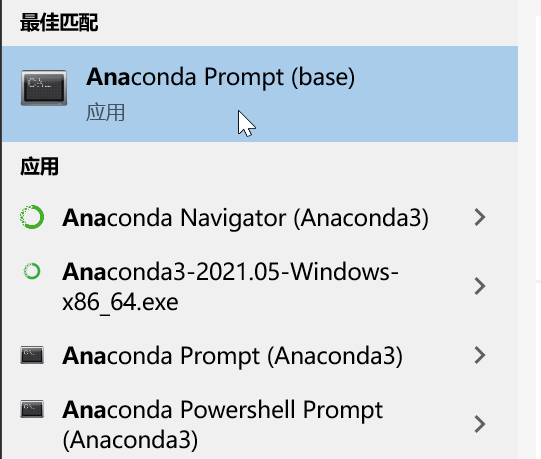
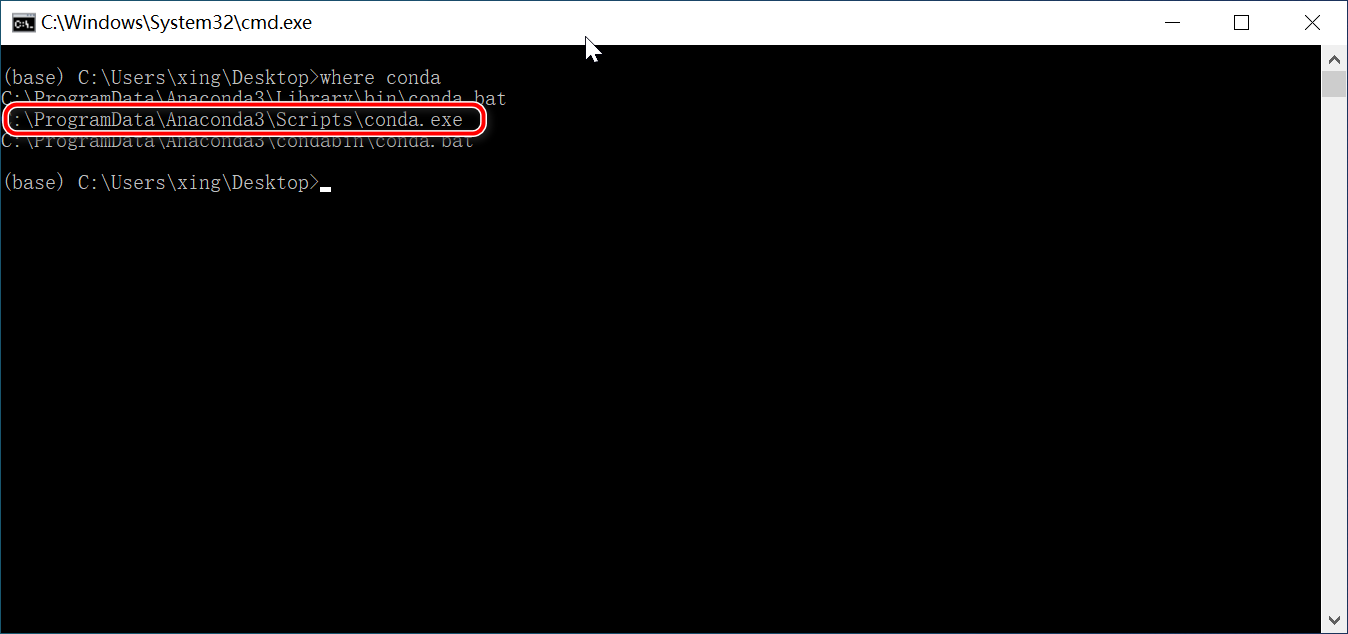
搜索anaconda,打开终端,然后搜索where conda命令,可以显示类似的结果。

where conda的搜索结果

复制conda.exe的全路径,然后在没有显示conda的powershell终端上,输入:

conda_full_path init powershell

关闭终端,然后重启,输入conda env list来验证修改的结果,如果正常显示内容,代表显示成功。

使用jekyll搭建站点,用markdown编写POST,如果图片都存在本地,而且repo存在类似github等国外网站的时候,速度就会非常慢。这个时候,如果图片放在图床或者对象存储器上,就比较轻量化了。我有一个腾讯云账号,对象存储服务每个月有10G的免费流量。之前都是使用自己写的上传脚本上传图片,然后将回传的地址复制到markdown文件中。

如果直接在vscode粘贴图片的过程就实现了上传,那就比较好了。搜索了一下,发现tencent-cloud-cos-upload-image这个插件可以实现该功能。不过使用的过程中,发现了在windows平台使用过程中的一个小bug。默认在windows中,path.seq为\符号,但是这个符号在cos中会被转移成文件名的一部分,导致无法正常上传到目标文件夹中。这个时候只能修改插件的代码了。

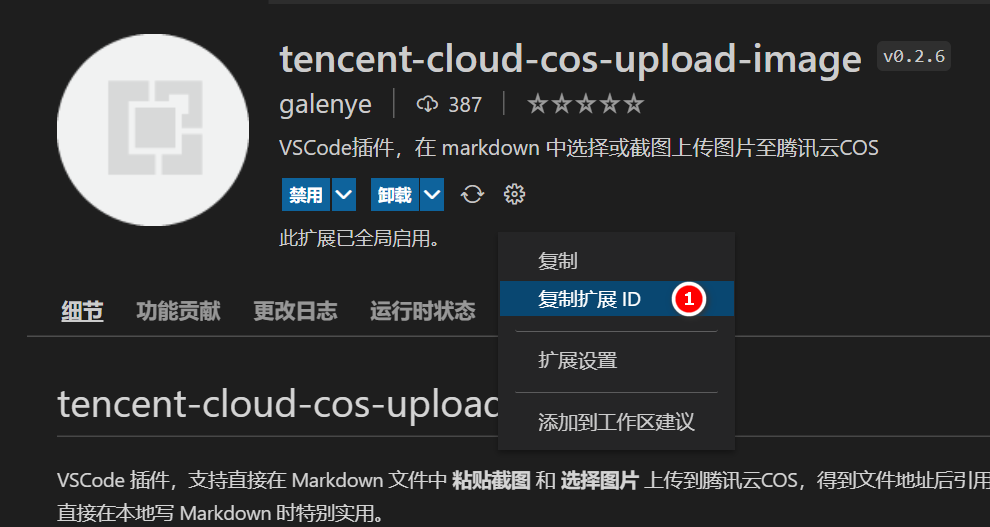
  • 首先,如下图所示复制插件的id

复制插件的id

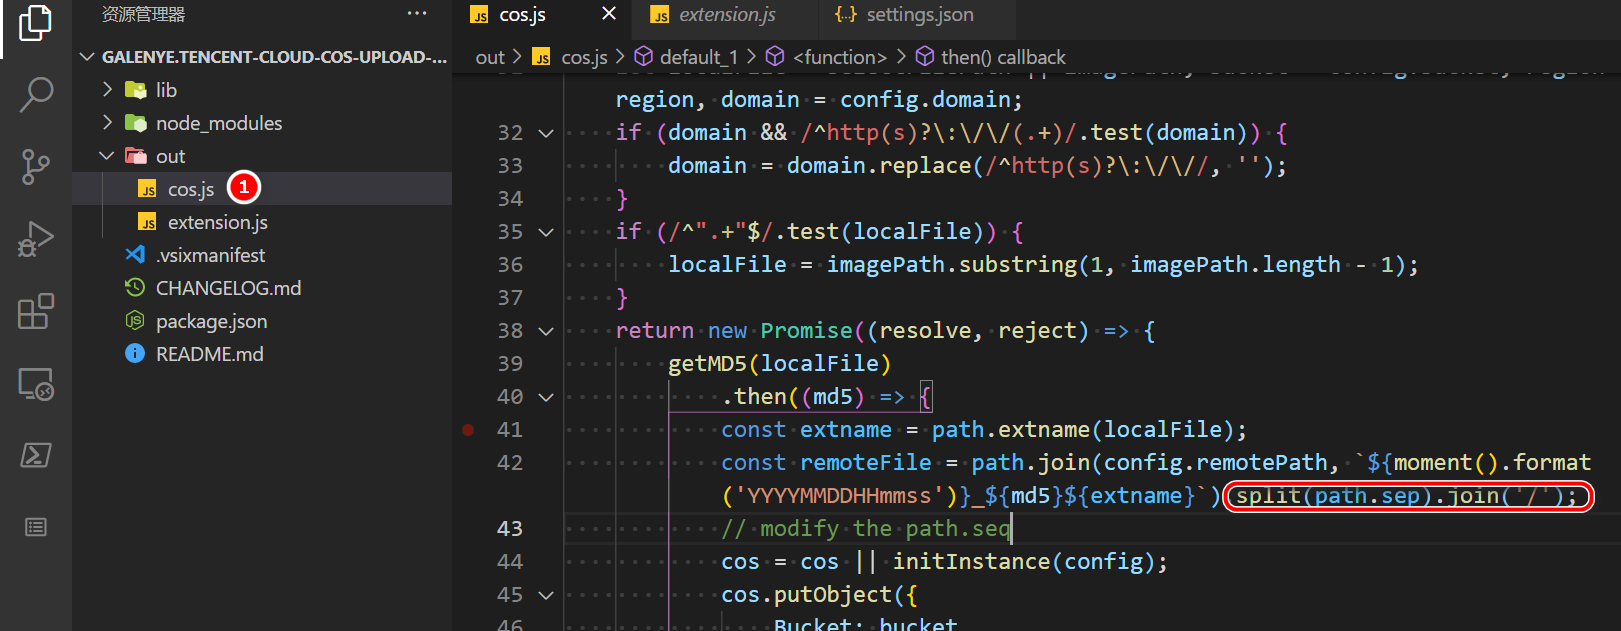
  • 根据id检索到插件所在的位置

修改插件代码

如上图所示,打开cos.js文件夹,增加红色方框处的代码,将path.seq从\更改成/,这样cos存储服务器可以正确识别路径,可以正确将图片文件上传到目标路径下了。